On Record Breaking

For those of you who don’t read Bell of Lost Souls, take some time now and punch yourself in the gut as hard as you can. Then, click the link over on the right side of this blog.
Today there was a link to some pics of the biggest Apocalypse game on record. Here is the article: http://www.belloflostsouls.net/2011/02/40k-worlds-biggest-apocalypse-game.html
Now, when I was reading the description, I saw that it was about 848,000 points of 40K, which is more than 8 times the size of my gaming group’s biggest game ever, the Big Game 5. But, when I read their table setup, they had a comparable amount of gaming area. Then I saw the pictures. Click the above link and scroll down. As you can see, all of the forces are about 12″ away from each other, and are packed about 18″ deep behind that. No terrain other than fortifications purchased with points.
To be fair, this LOOKS awesome. But the gameplay (if you can call it that) is going to be “OK NOW I SHOOT THAT THING.” Essentially whoever goes first blows up the other side, and then the second side blows up the first side. Woo. No strategy, no storyline, no REASON other than to have big numbers and to have more numbers than anyone else had ever.
It’s like making the world’s largest burrito. Sure, it’s impressive. But in the end, all you have is a crappy burrito that is really big.
Demoing Epic: one of my first attempts to teach a game.
A while ago I cleaned ChaosOrc out of most of their Epic Ork merchandise. Combined with ebay conquests, I got a sizeable Ork army for Epic. This gave me two armies of a large enough scale to play. My next problem: if I want to show kids how to play, HOW do I get them interested?
In the Epic Armageddon rulebook, there are “practice scenarios” that allow players to get used to the rules of Epic. This is all well and good for players who are already interested, but what about drawing in new players? Fooling around with a Space Marine unit or two won’t really let them get what Epic is about: BIG BATTLES.
So, I figured what I would do is make two balanced 3000 point lists, set up a battlefield, and let them have at it. I typed up a double-sided sheet which explained in brief the rules of Epic, what each of their units did, and what their strategies in general should be.
I set up a battlefield at 21C and waited for some players. I got my friends Alan and Al to play. Alan was the first to sign up and chose Space Marines. Al therefore played the Orks. Here is a brief description of the battle:
Mission: Tournament Scenario. Each player has one objective on their board edge and two on their own side. The tournament scenario has five win conditions. Blitzkreig: Hold the objective on the enemy board edge. Break Their Spirit: Destroy the most expensive enemy formation. Defend the Flag: Hold all 3 objectives in your board half. Take and Hold: Hold two objectives in the enemy board half. They Shall Not Pass: There are no unbroken enemy formations in your table half. At the end of turn 3, the player with more win conditions wins. If there is a tie, play a 4th turn. If still a tie, the winner is the one who has inflicted the most damage.
Setup: One board edge had about 1/3 of its side cut off by a shallow river, difficult and dangerous terrain. A large bridge spanned the thin river. This side also had about 5 ruined buildings, arranged as a small town, and one small forest. The other board half had several large forests.
Forces
Alan: Space Marines
-Warlord Titan
-Terminator Formation with Chaplain
-Assault Marine Formation
-Assault Marine Formation
-Devastator Formation with Hunter
-Tactical formation with Supreme Commander
-Whirlwind Formation with Hunter
-Land Speeder Formation with one Typhoon upgrade
-Thunderhawk Gunship
Al: Orks
-Great Gargant with Ork Warlord
-‘Uge Ork Warband with two extra units of Orks and Gretchin each
-Ork Warband with 2 Battlewagons, 3 Gunwagons, and Flakwagon
-Ork Warband with 2 Battlewagons, 3 Gunwagons, and Flakwagon
-Kult of Speed with 6 bikes, 2 Buggies
-Big Blitz Brigade with extra Gunwagon and 2x Oddboy Supa-Zzap Gun upgrade.
-Mekboy Stompamob
-Mekboy Gunzmob with Oddboy Soopagun upgrade.
-3 Fighta Bommerz
Deployment
Orks put the ‘Uge mob of Orks in a central forest. Each flank had one Boyz mob and one Gunwagon unit. Gargant was right in the middle. Kult of Speed on the flank. Gunz off slightly to the right. Stompas supporting the Gargant. Space Marines deployed Tactical formation with Supreme Commander in ruined town. Assault Marine units BOTH deployed inside the Thunderhawk off the board. Devastators were in the forest to the right. Titan in the center by the bridge, supported by Land Speeders. Whirlwinds center behind the town. Terminators in reserve.
Turn 1
Space Marine Terminators teleport behind enemy lines near the ‘Uge Ork Mob, in the back near Boys away from Nobs. Space Marines win initiative. Whirlwinds bombard ‘Uge Ork formation. Initiative seized, Terminators assault ‘Uge mob, lose 1 stand and break the ‘Uge formation. Ork Great Gargant activates and doubles, blasting three shields off of the Warlord Titan. Warlord Titan responds and blows four Power fields off the Great Gargant. Fighta Bommerz attack Whirlwinds, but Hunter suppression and poor rolls make their attack ineffective. Thunderhawk with embarked Assault units smash into an Ork mob, wiping it out.
Turn 2
Terminators begin harassing the broken ‘Uge mob to keep it broken and advance on Gunz. Gargant does another double, is now 1/2 way across the board. Assault Marines split up and wreak havoc, but are damaged by Blitz Brigades in return. Kult of Speed roars across the board. Devastators shoot, kill 1 bike unit. Titan smashes an Ork Blitz brigade.
Turn 3
Assault Marine unit 3 strong gets picked up by Thunderhawk. Remaining Assault marine unit 1 strong hides behind a forest. Ork ‘Uge mob regroups, attacks Terminators, kills all but 1 but still loses combat and flees again. Whirlwinds mop up Big Gunz. Stompas and Land Speeders duke it out in close combat, 1 Stompa and 2 speeders destroyed. Titan fires on Great Gargant and take down last power field. Gargant charges Tactical formation in Town, breaks them. Devastators break Kult of Speed. Hunter flak kills 2 Fighta Bommers, last bommer broken. Thunderhawk claims Ork objective
Final – Alan’s Space Marines win
Blitzkreig: Space Marines Break Their Spirit: Neither. Defend the Flag: Neither. Take and Hold: Space Marines. They Shall Not Pass: Neither.
Analysis: Both Al and Alan got how the game worked pretty quickly. Watching Al’s Gargant charge as Al shouted WAAAGH! was awesome. I think this plan would work pretty well for Epic.
Your Local Gaming Store
So for those that read the battle report previous to this, you know I played John in Battlefleet Gothic. We took off in search of some gaming space at Pandemonium Games in Garden City. Sadly, the place was crawling with Yu-Gi-Oh players and there was not a board to be found.
A quick call to Lexington and John pulled up the address for RIW Games in Livonia, which is actually closer to my house. We checked the store, but it was full of merchandise, no gaming space. I bought some paint and asked if there was gaming space in the back. The clerk told me that they have space in the same shopping area, but in a non-adjacent building. We pushed some tables together and got our game on, see the previous post for details.
During our prep, a man playing some sort of counter-terrorism board game noticed our Gothic game. He mentioned Epic, and I said that I played Epic. He pointed to a box of old bitz, filled with Epic stuff and said that in the room next door, there was a local Epic club playing! I introduced myself to them, and learned they have a forum: http://www.miniartofwar.net/smf/index.php
Hopefully I can get some games of Epic! All this from patronizing my (slightly closer) Local Game Store. They’re important!
Gothic Battle Report: Imperial Navy vs. Tyranids
Mission: Surprise Attack. An enemy fleet catches a planetary defense garrison unprepared.
Forces
Eric – Imperial Navy
Retribution Battleship with embarked Ld9 Admiral
Mars class battlecruiser with extra turret and upgraded batteries
Lunar class cruiser with Nova Cannon
Dauntless Light Cruiser (Lance)
Dauntless Light Cruiser (Lance)
6 Fire Ships
1 Orbital Defense Weapons Platform (Batteries)
1 Minefield
John – Tyranids
Hive Ship, Pyro Acid Batteries, Pyro Acid Batteries, 3 sets of port/starboard Launch Bays
Hive Ship, Massive Claws and Feeder Tentacles, Bio Plasma Spines, 3 sets of Bio Plasma Spines
Cruiser, Massive Claws, Pyro Acid Batteries
Cruiser, Massive Claws, Pyro Acid Batteries
12 Drone Escorts, Pyro Acid Batteries
4 Kraken Escorts
Deployment
Imperial Navy forces were arranged around the planet to cover all approaches. Tyranids arrived from a Long board edge.
Turn 1 Tyranids
Cruiser moves up and catches Dauntless light cruiser, kills with boarding action. Other Cruiser moves up and shoots the other Light Cruiser. Escorts move up and shoot the Fire Ships, one dies.
Turn 1 Imperial Navy
Dauntless light cruiser fires on Tyranid cruiser, no damage. Surviving Fire Ship kills one drone escort.
Turn 2 Tyranids
Fleet advances, Cruisers move over the planetary template, fire on another squadron of 2 fire ships. Assault boats diable weapons on Dauntless
Turn 2 Imperial Navy
Fire ships advance on Cruisers, cause several Fire critical results and one Fire on the Lunar class cruiser. Bombers from the Mars kill one Tyranid Cruiser.
Turn 3 Tyranids
More assault boats attack Dauntless, irrecoverably screwed. Kraken advance and fire on Mars, roll poorly, do nothing but force a BFI. Cruiser fires on Lunar, force BFI.
Turn 3 Imperial Navy
Last Fire Ship hits Hive Ships. Causes 1 fire on Carrier Hive ship, three on Claw Hive Ship. Also kills 3 drones. Dauntless disengages.
Turn 4 Tyranids
Hive Ships advance, Kraken destroy Mars class. Surviving cruiser hounds Lunar near minefield, then boards. Lunar wins boarding action by a huge margin and Cruiser dies. Carrier ship puts out fire, but Claw ship doesn’t and takes 3 damage.
Turn 4 Imperial Navy
Retribution moves around, pot-shots some drones. Lunar moves around.
Turn 5 Tyranids
Krakens move toward Lunar, team up with Hive Ship and severely cripple it. Surviving Drones move with Claw Hive Ship and destroy Orbital Defense. Claw Hive Ship takes 3 more damage and does not put out fires.
Turn 5 Imperial Navy
Lunar disengages. Retribution kills a Drone. Solar Flare wreaks havoc across the board.
Turn 6 Tyranids
Kraken start to turn around. Carrier hive ship enters large Gas and Dust Cloud. Claw Hive Ship takes 3 more damage from fires.
Turn 6 Imperial Navy
Retribution locks on and kills last Drone Escorts.
Turn 7 Tyranids
Krakens and some Assault Boats move toward Retribution. Claw Hive Ship disengages.
Turn 7 Imperial Navy
Retribution kills one Kraken.
Turn 8 Tyranids
Kraken disengage. Assault Boats move toward Retribution.
Turn 8 Imperial Navy
Retribution fails to disengage, removes Assault Boat wave.
Turn 9 Tyranids
More assault boats.
Turn 9 Imperial Navy
Retribution disengages.
Final victory points
Tyranids: 586, Imperial Navy 542.
Analysis: I deployed WAY too close to the board edge. Also, John had one REALLY good roll with the Krakens that killed the Mars class cruiser. Had I set up a little better I could have fared better. As it was the Fire Ships are the only thing that saved me. I HIGHLY recommend them for defense.
Memorable Games: Andy’s Map Campaign (me vs. Lexington)
For those unfamiliar with Map Campaigns, check out this link: http://fourstrandshobby.com/2011/02/13/memorable-games-joes-map-campaign/
Familiar with the basics? Good. Joe’s was not the only memorable map campaign. Andy put on TWO. One for Fantasy and one for 40K. I didn’t participate in the Fantasy one, but it was a GREAT idea. Essentially, a new Island appeared in the Warhammer Fantasy world, rich with Warpstone deposits. Every territory had a value. Coastal areas were a 6+, inland was 5+ and the slopes of the central mountain were a 4+, while the caldera was a 2+ but had nasty side effects if you rolled a 1. You got Warpstone from successful rolls each week, and the player with the most warpstone won. A great idea. Fantasy had never been played as much at our old Studio 40K club.
Andy’s other campaign was pretty standard. Unlike Joe’s campaign it was every person for themselves! I forget who “won” but it was just because the campaign went on too long. Here’s why I’ll never forget the campaign:
Me and Lexington had a knock-down drag-out competition the whole time. We literally never fought anyone else. We had some GREAT games that boiled down to this: If the Orks got there, Lexington won. If they didn’t I won. Zagdakka, Lex’s Warboss had some great victories and some horrible defeats. Par for the course for Zagdakka. My army leader was a 35 point Space Marine. Back in the 3rd edition there was a Space Marine HQ choice that had a Veteran Sergeant statline for 30 points. I gave him a Storm Bolter and boom: HQ slot filled for 35 points letting me take more Terminators and Devastators.
Another cool thing about Andy’s 40K campaign was that all the territories were occupied except one. This territory belonged to the Nightbringer and Andy’s Necrons. This was between me and Lex, so no other player could get to it without going through us. On the last night of the tournament, I attacked the Nightbringer. Andy left the model at home, so he ceded and declared that I won! This has to be the easiest kill of a horrific star god clad in living metal EVER.
Nob Bikers – Bane of Gaming
So I’ve been writing a lot about lack of balance and overpowered units. Nob bikers are the worst of the lot.
So of course I had to have some. Just to keep things even…
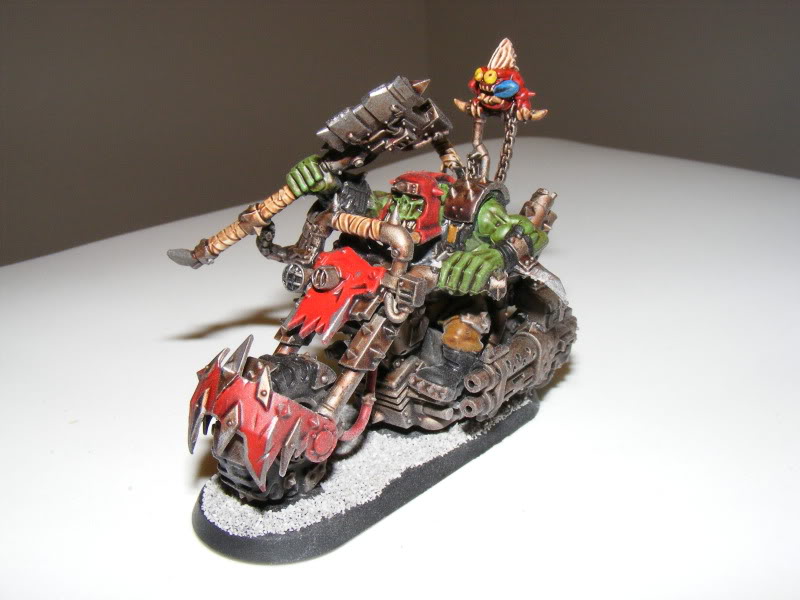

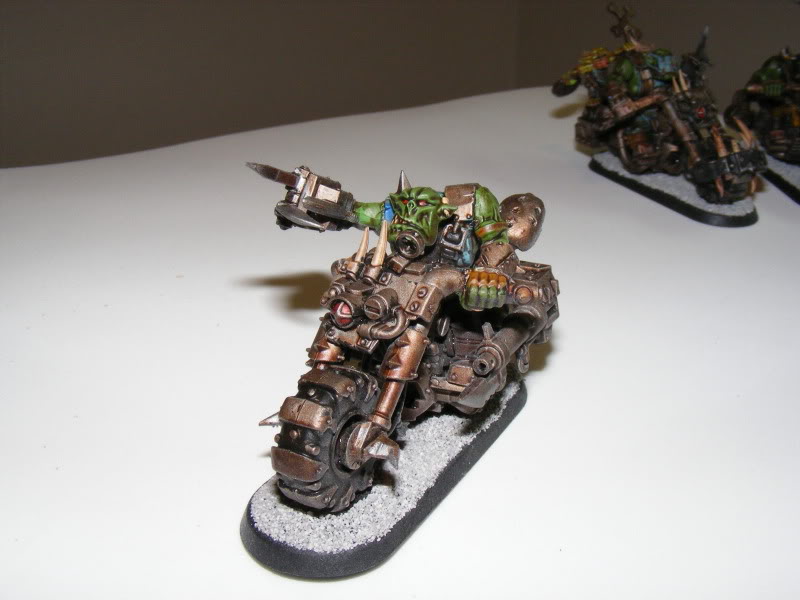
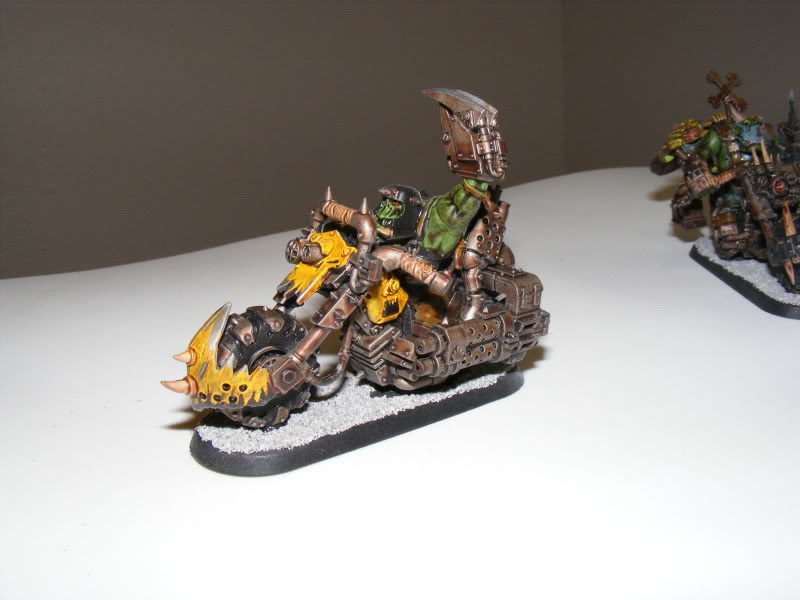
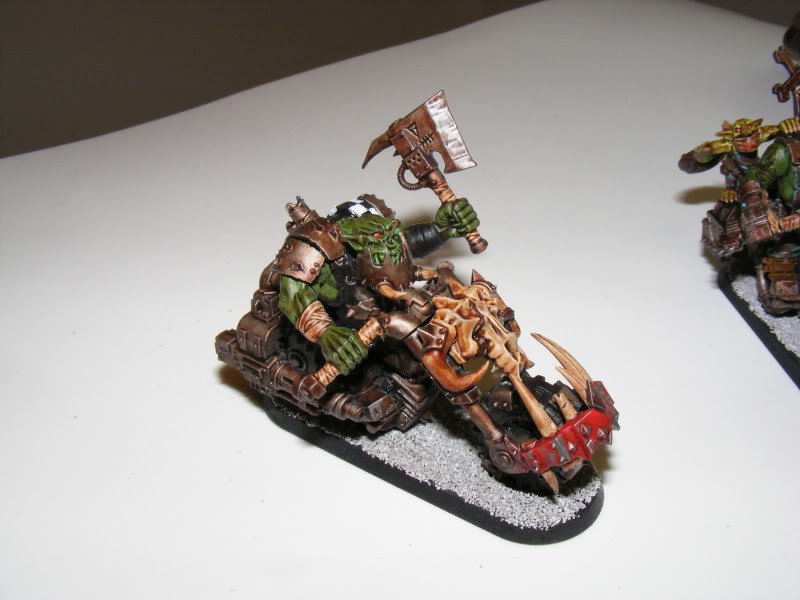
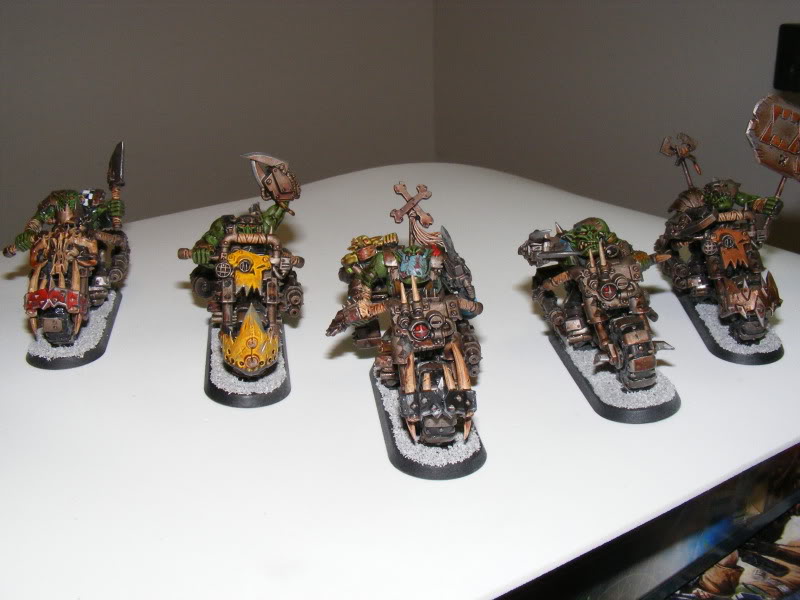
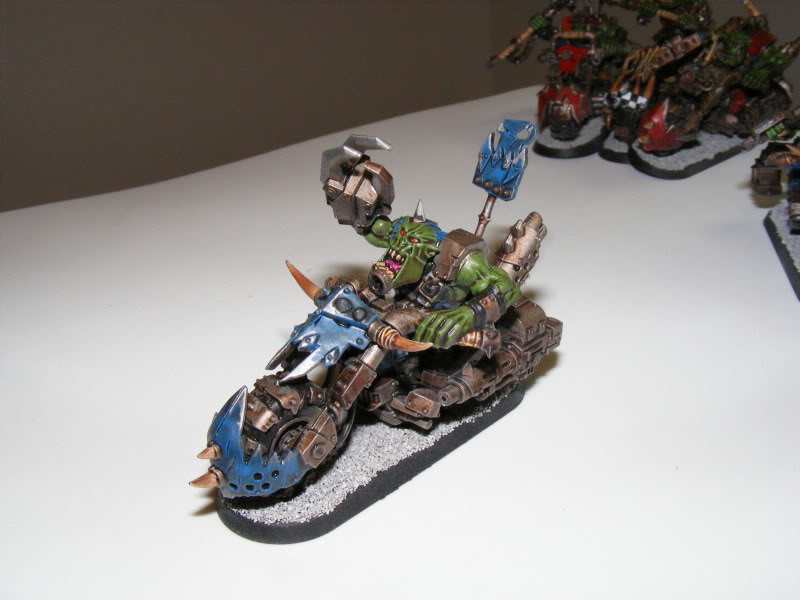
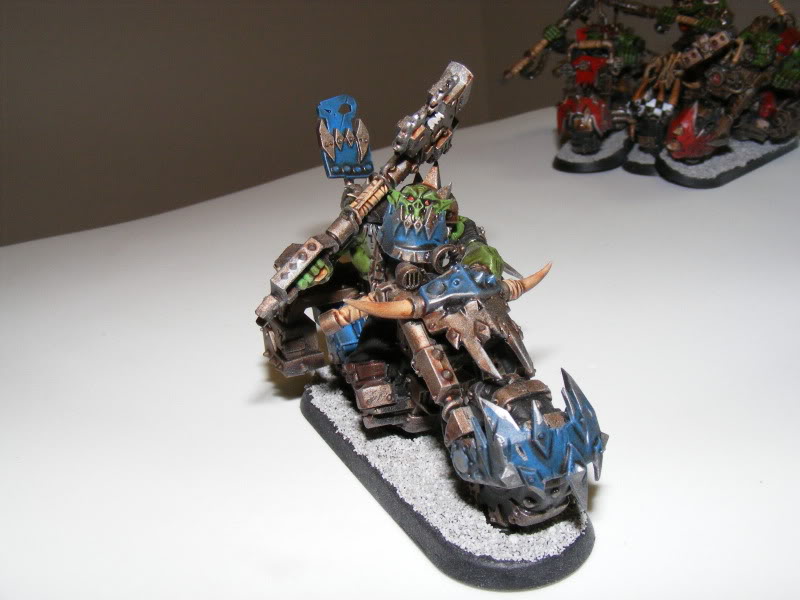
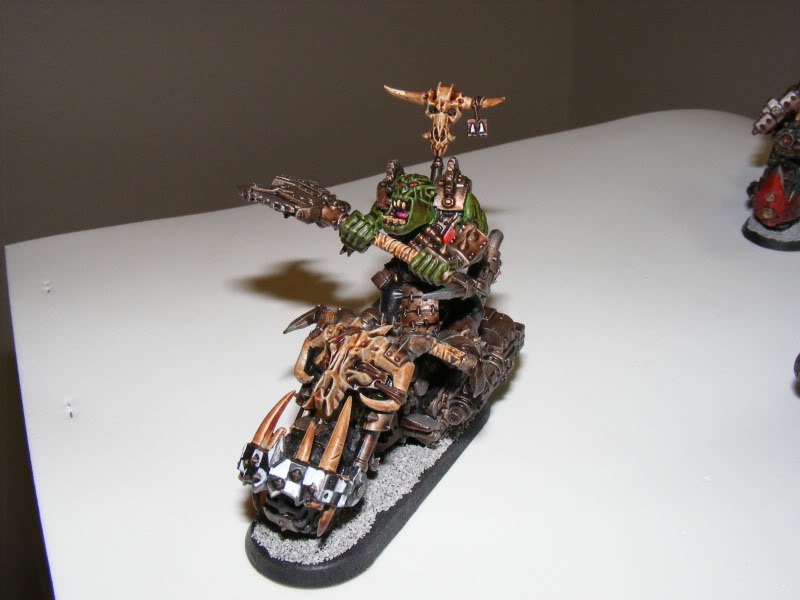
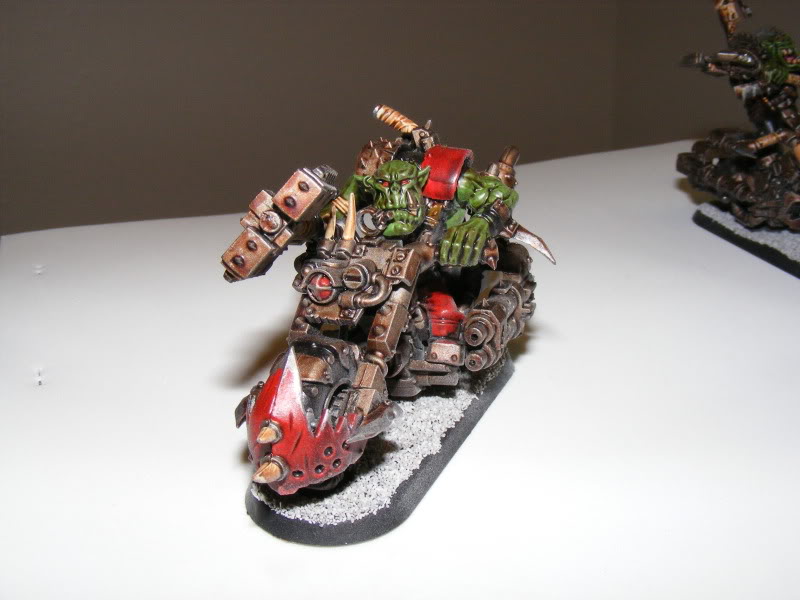
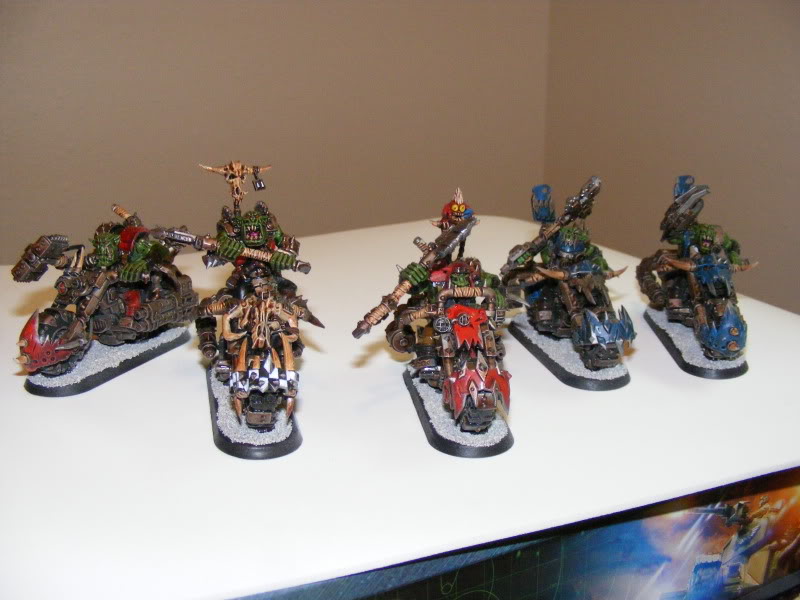
All of these use the Nob box set and the Ork Warbike box set. Some of the torsos were taken from the Ork Boys box set (the Nob body). Some of the legs are regular Ork Biker legs and some are plastic Nob legs sawed and re-puttied to look good. It’s hard to tell the difference.
So, as you can see from the weapon kit, I’ve made a lot of different options. Several Power Klaws and Big Choppas. There’s also one regular choppa. These have alternating Bosspoles and sans-bosspoles to create more annoying variety.
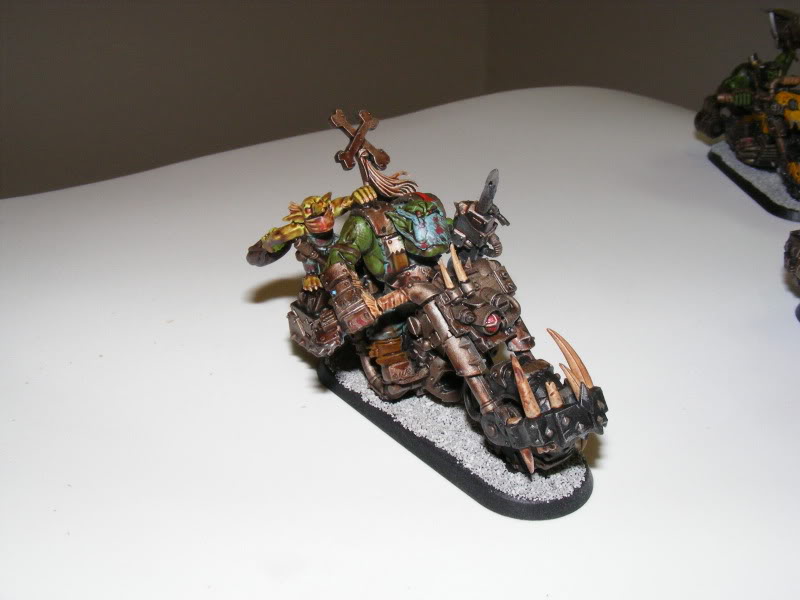
There’s also a Painboy. The Mask was made with putty. The syringe is made from the Ork Nob Harpoon Arm bionik, with the spool removed and the harpoon shaved down. A pin vise made the hole, and the canister is a Space Marine Meltabomb shaved down. The Grot Orderly mask is actually a grot head from the Plastic Gretchin box, and also uses the Ammo Runt arms with the Stikkbomb carved out. The bag is made of putty.
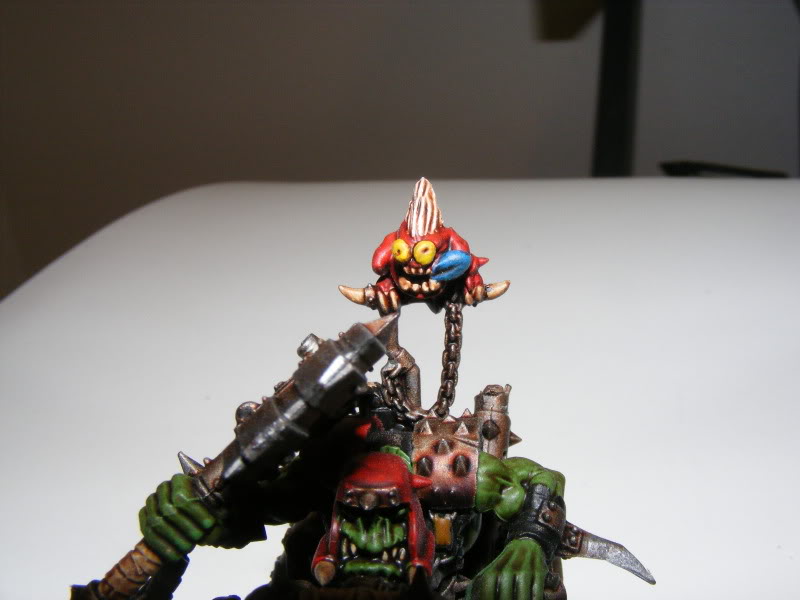
The WAAAAAGH! banner is made of brass rod and plasticard with the Ork skull on top. The glyphs read “WAAAAAGH! Smartyskull” in Ork.
In games I have used them, they have performed like you’d think they would. I usually don’t include them because it’s not fun to just have them rampage through everything and win uncontested.
Musings: What IS a point?
There has been a lot of complaining about balance lately. Some of it even came from this blog. However, all complaints about balance come down to one idea: something in the game is too powerful. This is a wrong way to think. It is my opinion that nothing can be too powerful.
I’ll stop for a second to let you clean up the drink you just spat out.
Nothing? Nothing. Not even an invincible model that has a weapon that kills every model within 24″ and cannot be removed from play, even by effects that instantly kill everything? Even that. Here’s why. It’s a nitpicky stupid way to look at it, but I think it works. Nothing is too powerful AS LONG AS YOU PAY THE POINTS FOR IT.
Which begs the question: what IS a point? How do you determine how much a model SHOULD cost? Chances are, you’ve heard another gamer say “Man (insert unit name here) should totally cost (insert integer here) more points per model.” But how did that person come up with that number?
Well, lots of people just make them up. However after being thrashed by Nob Bikers/Missile Wolves/Flying Circus/Whatever enough times, you figure out just how many points on average that unit kills. You then compare that to the actual cost of the unit. On average they should be the same, and if the one is higher (usually MUCH higher in the cases where this much complaining happens) then the unit doesn’t cost enough and is “overpowered.”
But this doesn’t answer the question. What IS a point? It is a mathematical representation of simulated military power. Because it has a fixed value (multiples of one, you can’t have half a point) then ideally on average a unit will “make its points back” plus or minus a bit. It’s those units that make WAY more than their points back on average that are overpowered or underpointed.
Sadly, once identified there’s not a really good way to fix the problem without an errata from the game company, which are sometimes rare (GW has been good lately, bringing Dark Angels and Black Templars back up to par).
Battlefleet Gothic Battle Report: Convoy
Mission
In convoy, a fleet is trying to protect a convoy of transports through an enemy blockade. The enemy is spread out thin to catch the convoy, so there might be a chance to punch through the blockade. In this scenario, the defender takes 100pts for every two free transports. The attacker recieves random forces from a table, on which they get D3 + (transports/2) rolls.
Forces
Alan – Imperial Navy
Lunar class Cruiser
Dauntless Light Cruiser (Torpedoes)
Dauntless Light Cruiser (Torpedoes)
Four Transports
Four Transports
Eric – Chaos (Got 5 rolls on chart, rolled 6,5,5,5,1)
Carnage class cruiser
3 Idolater escorts (lance boats)
3 Infidel escorts (torpedo boats)
3 Infidel escorts (torpedo boats)
2 Dreadclaw Assault boats
Setup
Primary Biosphere, medium planet, 2 moons. Planet was in lower left corner. Moon 1 in upper left, moon 2 almost in exact center of board. 1 gas/dust cloud high center. 2 Asteroid belts lower right.
Deployment
I deployed my marker beacons in a “W” shaped pattern with the Carnage class cruiser in the middle and the Infidels on the ends. Alan’s convoy came on from the left.
Turn 1 Imperial Navy
Alan brought in his 3 warships and no transports. One was close enough to reveal the closest beacon, 3 Infidels. 2 were destroyed, the third on BFI.
Turn 1 Chaos
Revealed Assault Boats, which hid behind the medium planet. Surviving Infidel moved behind main Imperial lines.
Turn 2 Imperial Navy
Alan brought on his transports. He moved up and turned to get line of sight to shoot the last Infidel. Infidel failed check to BFI, but amazingly survived. Assault Boats and boarding torpedoes attack transports, with no effect.
Turn 2 Chaos
Farthest marker revealed as 2nd Infidel squadron. Fails to All Ahead full. Lone Infidel attempts to board transport. Tie causes neither ship to be removed.
Turn 3 Imperial Navy
Fleet moves up to engage, fires at Infidel Squadron 2, no effect at extremem range. Dauntless cruisers reload ordnance.
Turn 3 Chaos
All remaining markers revealed. Chaos forces engage Imperial fleet, do minor damage. Lone Infidel reloads ordnance, fires, kills one transport with Boarding Torpedoes.
Turn 4 Imperial Navy
Dauntless cruisers lock on, fire on Idolaters and Infidels. One Idolater destoyed. Transports fire on lone Infidel, no effect.
Turn 4 Chaos
Carnage class cruiser moves throught imperial lines, draws bead on transports, destroys one. Infidel squadron fires torpedoes, kills one transport. Idolaters also kill one transport.
Turn 5 Imperial Navy
Imperials bring forces to bear on escorts. BFI rolls make only one Infidel die.
Turn 5 Chaos
Further shooting reduces imperial transports to 2. Game ceded.
Analysis
Convoy is HARD. It is almost impossible for the convoy to make it if the enemy has rolled well, and the bigger the game the better they can be. The defender is better off with smaller ships like the Dauntless or some escorts. The attacker needs to essentially ignore the main lines and get through to the transports. If the defender rushes ahead, this is actually easy. The defender needs to slow it down and blast anything that comes close.
Memorable Games: Joe’s Map Campaign
Most gaming clubs work like this: everyone shows up, people who arrive find others and say “want to play X points?” and then they do. However, there is a more complex way to play that covers the struggle to dominate an entire world.
I speak of the venerated Map Campaign. To some, the pinnacle of the gaming experience. Map campaigns are immersive and engaging. They make casual game nights into fights for the fate of a world.
Some explanation for those unfamiliar with Map Campaigns. The person running the campaign creates a map with territories on it. These are then distributed to the various players/teams. Some territories could give special bonuses, such as an airport giving the owning player the ability to attack far away territories, or a factory letting players replenish their forces more easily. Players can attack other players territories to take control. Often, players’ army lists are limited, so that taking heavy losses can be worse than losing. The object of the campaign is to take over all of the map.
Joe put on a team based map campaign back in the Mary Mayo days. There were four teams, each with three players. My team consisted of myself (Azure Flames Space Marines) Scott (Cadian 401st Imperial Guard) and Lexington (unknown Imperial Guard regiment, which has since been sold). We were the white team, facing the red, blue, and black teams. There were several odd matchups, including Maestro’s Blood Angels with Dan’s Tau and some Chaos and Space Marine pairings.
In Joe’s campaign, the amount of territory you held gave you points to replenish destroyed units, so teams had to ration their points to the players that would make their forces more effective. We ended up spending a lot of points on Lexington, as he was our “holding force.” Lexington’s guard army essentially took the worst beatings other players had to offer, and Scott and I pushed out and gained territory. This ended up working really well.
Joe’s campaign also had cards Joe made himself and each player had one that was shared by the team. Cards had varying effects, among them: “They have a Cave Troll!” which would add a Troll to your forces.
Some highlights:
-I won one of the rare crushing victories against Dan’s Tau. This had a lot to do with some bad deep strike rolls on his part and some good setup on mine. He played the “Play the same battle over again.” card, and so I played the “The battle doesn’t get fought.” card, negating that. I lost the victory, but forced him to use that incredibly valuable card for nothing. As a bonus, his team did not conquer our territory.
-During the whole campaign, Maestro’s Blood Angels used the “Rhino Wedge” tactic, essentially driving empty rhinos around, and parking them in a V shape. Then, his Death Company would hide in the V of this formation and not be a valid shooting target. It was a terrible rules error in 3rd ed that allowed this to be viable, making this a real deadly combination. Maestro was finally stymied by Scott. Maestro attacked us and played a card that let him bring 2500 pts to a 2000 pt game. He set up. Scott set up his invincible Cadian gun line. Maestro ceded the fight and put his models away. Scott won that game with a STARE.
-In another epic battle with Dan, Chaplain Alexsandr, my Terminator Chaplain pulled victory out of defeat. In 3rd ed there was a mission in which the defender (me) splits their forces in half, and DOESN’T GET TO USE THE SECOND HALF. Half of your army is GONE. However, the enemy has to kill EVERY model left or they lose. The last turn had only Chaplain Alexsandr on my side in close combat with Commander Farsight. The battle dragged on (because Dan kept making 4+ invulnerable saves) until the end of the game. After the game, Dan and I rolled out one more round of close combat. Alexsandr made three 4+ invuls and FINALLY killed Farsight. Woo!
-Lexington also faced off with Maestro, taking as many plasma guns as he could. Ideally, enough of these SHOULD pop a Rhino, but I guess no on ever told Maestro that as his invincible boxes of doom approached Lex’s lines. That Rhino Wedge technique was good on average, but without dedicated anti-tank or a lucky roll it was UNSTOPPABLE.
-EDIT: According to game master Joe himself, Dan blew all his points that could normally be used to buy units and spent them on cards. He then used every card against Scott in one night. Scott lost, but we replaced his losses immediately, and Dan was out of cards.
Endgame
In the end, our victories outweighed our losses and we ended up winning the campaign handily, even when the other 3 teams all turned against us. It was a blast, but I don’t reccomend it more than once a year for a group. It’s a lot of work and it’s not the only reason you should play.
Memorable Games: Fighting Catachans in the Jungle, and Brother Jonathan
There was an axiom in 3rd edtion 40K: Never fight the Catachans in the Jungle. They got all sorts of wicked benefits, and their low armor was negated by having cover saves everywhere.
During my first summer at college, we used to play in Joe’s garage. Joe’s army choices at the time were the Angels Sacrosanct, a Blood Angels successor, and some Catachan Jungle Fighters. Once, in Joe’s garage, we set up a jungle fight. We used a green board, some tree bases, and created some white paper templates and strips about 3″ wide. The templates were clearings, and the strips paths. Everywhere else was forest. Who wanted to fight the Catachans in such terrain?
Enter the Azure Flames, newly swelled from almost a full summer of obsessive-compulsive collecting and painting. I took a 1500 point list that contained 11 flamers and 2 heavy flamers, all infantry. I marched across the board, burning as I went. Catachans don’t get cover saves from flamers. Embarrassing Jungle Fighters in the Jungle is impressive.
Joe got his revenge. In a normal later game Joe took a Leman Russ battle tank that sat hull down behind a chest high wall, and shrugged off every weapon fired at it. Worse, he had some decent close combat ability, which killed at least one squad. However there was a silver lining. One tactical squad was whittled down to one bolter marine who stood toe-to-toe with a commander with a power weapon and a commisar with power fist, and a command squad. This lone marine stood for SIX ROUNDS OF COMBAT, killed a few guardsmen and fought so fiercely that the commander would have fled, had the commisar not shot him in the head! This marine was the first of my models that earned a name. Brother Jonathan of the 2nd squad 4th company. I still field him on a regular basis.