Blood Bowl Weather Flip Display
Tired of trying to remember what the weather is during your Blood Bowl games? Well, worry no more!


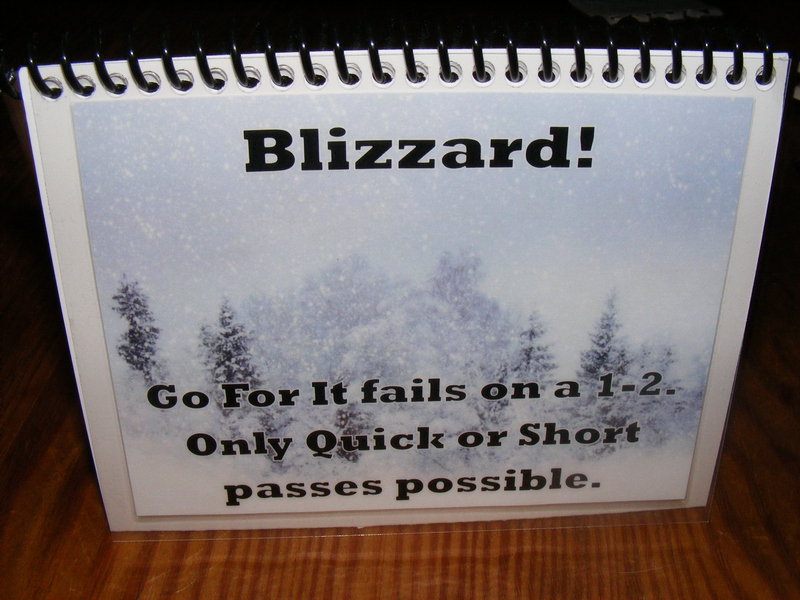
With this handy flip display, both players can see what the weather is, and the effects that weather has on the game. The display shows on both sides so both players can see it easily. The base is made to be slim, so that the display stands up and takes up little space on the tabletop. It’s easy to change and stands up well.
Find the file and instructions for printing in the Blood Bowl Compendium page!
Next: Ork Blood Bowl coach, and support staff!
Highland Library Golden Rhino Tournament 7-28-15
It’s TOURNAMENT TIME! All the prep I’ve been doing will either pay off or fail dismally. How did I do? Read on to find out!
Spoiler alert: due to an overly long lunch and other factors, we only played three 2 hour games instead of 4. Sadly, this means we did not get to play mission 4 which was my favorite of the 4.
Before we begin, here’s the goodie bag I got for entering:

Included in the bag: a bunch of White Dwarf magazines, some Age of Sigmar promo stuff, and two balls of fluff, painted and embedded with a tea light to make it look like smoldering wreckage! Also, six sculpey-clay numbered objectives that hold a die to mark Mysterious Objectives and another objective that looks like a brain! NEAT!
————————————————————————————————
Here is the list I took in all three games. Remember, I am trying to win in an anything goes tournament with a Combined Arms detachment Highlander list.
Bozeman – Azure Flames Space Marines (Salamanders) – 2000 pts
-Leonidas, captain of the 1st company (counts as Vulkan He’stan)
-Librarian, Level 2, Space Marine Bike, Melta Bombs
-Dreadnought, Extra Armour, 2x Twin Linked Autocannons
-Ironclad Dreadnought, Ironclad Launchers, Chainfist, upgrade Storm Bolter to Heavy Flamer
—Drop Pod
-Bike Squad x8 with Attack Bike, Veteran Sergeant, Power Fist, Melta Bombs, 2x Meltaguns, Multi-Melta
-Tactical Squad x10, Veteran Sergeant, Power Fist, Combi-Melta, Meltagun, Multi-Melta
—Rhino, Extra Armour
-Tactical Squad x10, Veteran Sergeant, Power Fist, Combi-Flamer, Flamer, Multi-Melta
—Rhino, Extra Armour
-Scouts x5
—Land Speeder Storm, Multi-Melta
-Assault Squad x5, 2x Flamer
—Drop Pod
-Land Speeder Squadron x3, 3x Multi-Melta
-Predator Destructor, Heavy Bolter sponsons
-Thunderfire Cannon
All missions have: 2 ruins, 2 craters, 1 impassable LOS blocking terrain, 1 river or water feature, 2 forests, and 1 armor 14 building. Each mission also has the special rule At Any Cost: You may target the building, even if it is friendly.
Wins give 3 tournament points, ties 2 and losses 1. Ties at the end of the tournament are settled via # of victory points total for all 3 games.
———————————————————————————————
Mission 1 – Command and Conquer
Dawn of War Deployment, 3 objectives in neither player’s deployment worth 3VPs and 1 in each deployment zone worth 5 VPs.
Opponent: Chris – Eldar Harlequins with Craftworld Eldar allies.
Quick Breakdown: Chris started with a brutal Alpha Strike. I was unable to do much at first. The lead Harlequin charged the bikes with the Librarian, killing everyone but the Librarian. The Librarian cast Sunburst in a brutal Nova, killing a large amount of the Eldar force that had bunched up. Leonidas and the Assault Squad deep struck out of position and did little damage. A Solitaire killed most of the Assault Squad and dashed away. Most of my remaining forces on the left side of the board died, but Leonidas and the surviving Sergeant ran on turn 4 to deny objectives. Due to time limits the game ended after 4 turns. Final score: Azure Flames 7, Eldar 5.

Our setup

Alpha Strike kills the bikes and land speeders!

The Librarian survives against the odds, and pulls off a devastating Sunburst.

The left side of the board goes poorly for me.

The Solitaire leaves combat after wounding Leonidas and killing 4/5 of the assault squad.

On the right side, Chris killed everything except this Rhino with a Tactical Squad inside, who dutifully sat on the objective all game.

Endgame: Leonidas scores objecive 3 while the Assault Sergeant contests objective 1, snatching victory from the jaws of defeat!
Postgame: I should not have won, but the time limit saved me. Chris was less than pleased. On to the next game!
————————————————————————————————–
Mission 2 – Recover the Standard Template Construct!
Hammer and Anvil Deployment, carryable objective similar to the Eternal War mission 6: The Relic.
Opponent: Stephen – Chaos Daemons of Nurgle with Death Guard Chaos Space Marine allies.
Quick Breakdown: Stephen’s army moved forward in a wave on turn 1. His Daemon Prince of Nurgle summons some Nurglings… and Perils of the Warp removes the Daemon Prince as a Caualty! Amazingly, the Daemon did this in Stephen’s previous game. Leonidas deep struck and with him and the Thunderfire Cannon, half of the Zombies are removed. Stephen bolsters the remaining zombies by enfeebling Leonidas and his squad with a Great Unclean one… AND PERILS REMOVES THE GREAT UNCLEAN ONE AS WELL! This is the most unlikely thing I’ve seen in a game, and I’ve played against Lexington. A Helldrake arrived and killed half the bikes and half a Tactical squad before re-rolling Melta brought it down. Leonidas and the Assault Marines whittle down the zombies until another Great Unclean One finishes them. The objective, held by Nurglings, is dropped as a Tactical Squad charges them. Both sides throw everything they have at each other. In the end, no one holds the objective. Final score: Azure Flames 9, Chaos 7.

Stephen’s setup

My setup, with the objective circled.

Centered in this picture: the empty hole where a Daemon Prince was sucked back into the warp. Papa Nurgle ANGRY.

Not pictured: 15 zombies that burned or exploded.

Upper left: a Great Unclean One is killed by Perils, while on the bottom a Helldrake incinerates four bikes.

A last-ditch charge dislodges the objective and confounds the Nurglings!

Typhus and his Terminators arrive… a bit too late to salvage the objective.
Postgame: In baseball you win 1/3 and you lose 1/3, it’s what you do with the other 1/3 that counts. This game was a gimme. Stephen lost around 600-700 points from Perils of the Warp, and amazingly lost the same Daemon Prince twice in two games! Other than that, I just tried to win by Kill Points which worked pretty well.
————————————————————————————————–
Interlude
Lunch was catered by a fancy Hamburger joint and was worth all the money the Highland Library paid AND MORE! After lunch, the Painting Competition was scored. Franklin, who was not participating in the tournament, won first. I won second, but when you see Franklin’s Necrons you will see why:

Absolutely stunning.
——————————————————————————————————
Mission 3 – The Deadline
Vanguard Strike Deployment, Maelstrom of War objectives. All tables generate the same Objectives, and objectives 11-16 are from the main book, not from your codex. Each round, any objective that is not scored or discarded is COUNTED NEGATIVE to your score! At the end of the game, your total cannot be less than zero.
Opponent: Ian, event co-ordinator – Sisters of Battle with Inquisitorial and Knight allies and Legion of the Damned, in addition to a giant Plasma Obliterator.
Quick Breakdown: Ian stole the initiative! I went 2nd in all three games this tournament. Ian pinned down my forces with some heavy firepower. Sadly for him, his objectives were un-scorable while mine were easy. I got off to an early lead, as a good round of shooting killed Ian’s Warlord: Uriah Jacobson. Ian’s Knight Titan stomped all over the left side of the board, wrecking unit after unit. The Legion of the Damned arrive, kill the Predator, and hold Objective 1 which Ian had to secure several times in the game. Land Speeders and Bikes remove Ian’s tanks one by one. Outflanking Sisters botch a Meltagun wave, sparing the Thunderfire, who cuts them down in return. An overheat in the Plasma Obliterator kills the Inquisitor manning it! Objectives go back and forth in a frenzy. Final Score: Azure Flames 19, Sisters and Allies 9.

The Azure Flames advance slowly on the right side of the board.

The Ironclad removes Uriah Jacobson’s Immolator, and the rest of the army blows the squad inside away.

Nothing can stop the Knight Titan!

The Sororitas recieve Aid Unlooked For…

The Sisters fail to remove the Thunderfire Cannon, and the Thunderfire and Dreadnought cut them down, while the Tactical Squad removes their Immolator.

To score a point, Ian blows up the bunker. Why? Because Maelstrom.

The Plasma Obliterator overheats, killing the poor Inquisitor inside!
Postgame: This was the most fun game of the three I played. Although I took an early lead, Ian got some good turns later and I was on the edge of my seat thinking that I could have a bad turn to screw it up. Luckily that didn’t happen. Knight Titans are still such a big problem. I have no idea how to kill one without buying a whole new Sternguard squad full of meltaguns.
——————————————————————————————————-
Conclusion:
I tied with Loki (see previous posts for prep game against Guard), but because I got more VPs total over all 3 games, I WON THE TOURNAMENT! WITH A HIGHLANDER COMBINED ARMS! WOOOOOOO! Oh man, I feel great! 40K has problems, as it always has, but IT IS OFFICIALLY STILL FUN!


I also won this absolutely sweet book bag:


In the end winning and painting got you raffle tickets. Here’s what I won with mine:

A 6th edition Dark Angels codex (cost me one ticket!) A tile with Lord of the Rings models superimposed on it. Games Workshop dice cube. Finally, a custom made Doctor Who dice bag, made by the significant other of Event Organizer, Ian! My fiancee, who sews and is openly critical of bad sewing, declared it to be of very high quality. Her exact words were: “She’s got sewing game!”
Finally, we all took a picture:

This was the best time I’ve had playing 40k in a LONG TIME. Second best to Big Game V. Truly awesome. The Highland Library 40K club is a wonderful group, and if you are even REMOTELY close, check them out on the last Tuesday of every month at the Highland Library. Finally I’d like to say thanks to Dawn, who let me into the Library before it was open to use the restroom. Seriously, thank you.
Next: I don’t know! I’m pretty tired. Perhaps Tau Battlefleet Gothic, Blood Bowl Ork helper models, or Necromunda Escher? Stay tuned!
Tournament Prep part 3: Extra Cheese
Previous opponents have had some fun in their list, but nothing overtly ridiculous or game breaking.
Couldn’t last forever.
In my final test to see if I’m competitive, I played an over-the-top Inquisition-Guard-Knight list with a lot of dirty tricks and a LOT of psykers! My opponent, who wishes to go by his gamertag Loki 1003, put together a list that assumes a cadre of Inquisitors wrangeled together a Scholastica Psykana contingent, an elite Imperial Guard regiment, and a Knight Titan into a juggernaut of psychic power and unbeatable destructive capabilities. Can I succeed? Let’s find out!
——————————————————————————–
Bozeman – Azure Flames Space Marines (Salamanders)
-Leonidas, captain of the 1st company (counts as Vulkan He’stan)
-Librarian, Level 2, Space Marine Bike, Melta Bombs
-Dreadnought, Extra Armour, 2x Twin Linked Autocannons
-Ironclad Dreadnought, Ironclad Launchers, Chainfist, upgrade Storm Bolter to Heavy Flamer
—Drop Pod
-Bike Squad x8 with Attack Bike, Veteran Sergeant, Power Fist, Melta Bombs, 2x Meltaguns, Multi-Melta
-Tactical Squad x10, Veteran Sergeant, Power Fist, Combi-Melta, Meltagun, Multi-Melta
—Rhino, Extra Armour
-Tactical Squad x10, Veteran Sergeant, Power Fist, Combi-Flamer, Flamer, Multi-Melta
—Rhino, Extra Armour
-Scouts x5
—Land Speeder Storm, Multi-Melta
-Assault Squad x5, 2x Flamer
—Drop Pod
-Land Speeder Squadron x3, 3x Multi-Melta
-Predator Destructor, Heavy Bolter sponsons
-Thunderfire Cannon
——————————————————————————–
Loki – Inquisitorially Mandated Imperial Hodgepodge
-Malleus Inquisitor, Psyker level 1, Daemon Blade (Warlord trait: -1 to all Daemon saves within 12″)
-Malleus Inquisitor, Psyker level 1, Daemon Blade
-Hereticus Inquisitor, 3 servo skulls, Psyocculum
-Hereticus Inquisitor, 3 servo skulls, Psyocculum
-Imquisitorial Henchmen: Sanctioned Psyker x3
-Imquisitorial Henchmen: Sanctioned Psyker x3
-Imquisitorial Henchmen: Sanctioned Psyker x3
-Imquisitorial Henchmen: Sanctioned Psyker x3
-Imquisitorial Henchmen: Sanctioned Psyker x3
-Imquisitorial Henchmen: Sanctioned Psyker x3
-Company Command Squad, Astropath, Master of the Fleet, Master of Ordnance, Standard, Lascannon
-Company Command Squad, Astropath, Master of the Fleet, Master of Ordnance, Standard, Lascannon
-Veteran Squad x10, 3x Plasma gun, Lascannon, Demo Charge
-Veteran Squad x10, 3x Plasma gun, Lascannon, Demo Charge
-Rough Riders x8, Meltagun
-Knight Crusader, Icarus Autocannon, Meltagun, Melta-Cannon, Mega-Bolter
-Callidus Assassin
——————————————————————————–
Tournament Mission 3: The Deadline
Terrain: 6’x4′ board, 2x ruined buildings, 2x hills or craters, 1x impassable LOS blocking feature, 1x river or water hazard, 2x forests that count as “twisted copses,” 1x Armor 14 medium building with 4 access doors and 4 fire points, one in each direction.
At Any Cost: The building may ALWAYS be targeted for shooting and assault, regardless of who is occupying the building.
Deployment: Dawn of War
Maelstrom of War: Each player generates 3 objectives each turn. At the end of your turn, you may discard one. Any objective not scored or discarded SCORES NEGATIVE! It’s do or die! This, however, cannot bring your total score to below zero.
——————————————————————————–
Deployment


Loki chose sides and went first. No seize, no night fight.
——————————————————————————–
Inquisition Combined Force – Turn 1
Orders allow lascannons to snipe at the Predator with ignore cover, blowing off a heavy bolter and glancing it. The Titan blasts the smaller bike combat squad, earning First Blood. The Callidus Assassin hurts the Thunderfire Cannon, and claims objective 4 for a point. Horrendous psychic phase sees two out of nine psychic powers successfully cast.

I guess the Psykers haven’t had their coffee yet…

There used to be some bikes here…

The Callidus eschews a quick kill to score points.
Azure Flames – Turn 1
Right flank moves up to hide behind the big wall. The flamer Tatsquad deploys to the building and shoots the Callidus, doing one wound. The Ironclad arrives and manages to somehow severely damage the Warlord’s Command Squad, a psyker squad, and a veteran squad. The Warlord and one other Inquisitor are all that is left, and they break and flee!

Holy crap, a titan! Hide!

The building is secure.

Fwoosh!
Inquisition Combined Force – Turn 2
The Titan shoots the Ironclad and the Predator, killing them, and the drop pod. It then charges the drop pod, glancing it to death. The Rough Riders charge the Tactical Squad, killing five, but losing three. The Callidus shoots the Thunderfire, destroying the cannon, and then charges the Techmarine, but there is no result. The Master of Ordnance, enhanced by a psyocculum, shoots the bikes behind the wall, killing 3 and glancing one Land Speeder.

The Titan is capable of killing three units in one turn. So, yeah, superheavies have really added a new dimension to the game. About this time, I feel like this Drop Pod, as I have no way to stop this rampaging titan.

Rough Riders hit hard.

The Callidus whiffs!

The teeth of the enemy list is revealed! An ignores cover S9 AP3 large blast that is BS 10 against units that contain psykers!
Azure Flames – Turn 2
Reserve shenanigans prevent reserves from arriving. The Librarian advances, and uses Inferno to blast a Veteran squad. The Land Speeders move flat out as a distraction. Combat with the Callidus and Techmarine continues with frustration. The remaining two Tactical Marines kill a Rough Rider. Turn not pictured.
Inquisition Combined Force – Turn 3
More ignores cover ordnance wipes out the Librarian and the bikes. Poor fire and good jink saves kill only one Land Speeder. The Callidus finally finishes off the Techmarine.

…predictably the Librarian is removed. Had I known that the Psyocculum was the thing making this possible, I’d have run the Librarian alone to spare the bikes.

Techmarines are no match for an assassin.

DISTRACTION!
Azure Flames – Turn 3
In a bid to get points, the Land Speeders go for an objective. Sadly, the psykers on the objective go to ground and deny me the point! The Rhino takes the last wound off the Callidus with a lucky shot.

A desperate gambit doesn’t pay off…

Lucky shot!
Inquisition Combined Force – Turn 4
The last Tactical marine is killed by Veterans. Another Veteran squad wipes out the Land Speeders.

Nothing can stand up to plasma, lascannons, and a titan.

Gone.
Azure Flames – Turn 4
Leonidas and the Assault Marines arrive. Despite having Invisibility, the Warlord’s squad takes the brunt of two flamers and a heavy flamer! How? Leonidas leaves the Assault Marines, and targets a psyker squad, getting four of the Invisible Command Squad, while the Assault Marines target the Veterans, killing them and hitting three of the Command squad! Finally, the Warlord’s squad breaks and FLEES OFF THE BOARD. No more ignores cover crap. The Scouts come in on the left, when I wanted them on the right, so their Land Speeder goes flat out. Turn not pictured, sadly, as it was GLORIOUS.
Inquisition Combined Force – Turn 5
The Titan blasts all but one Assault Marine, and assaults Leonidas, killing him.

Azure Flames – Turn 5
Despite a valiant effort, the Scouts can’t do much. Time exceeded. Turn not pictured.
——————————————————————————–
So, how’d I do?
Inquisiton: 7 plus Slay the Warlord and First Blood for 9
Azure Flames: 7 plus Slay the Warlord and Linebreaker for 9.
——————————————————————————–
WHOOOOOOO… Damn. That list is BRUTAL. With reserves control, ignores cover ordnance that is BS 10 against psykers, 14 Warp Charges base, and a goddamned Titan, this is a list that can dish it out. However, it can’t really take it and it doesn’t have the tactical flexibility. This is another leafblower. It’s really good. However, it relies on a lot of randomness. Loki got off Invisibility several times. If he hadn’t had Invisibility, that squad with an infinite rage death pie plate would have actually been targetable in the mid and late game.
To another completely different point, I had about 2 bad turns of objectives while Loki had about one. I still hate Maelstom of War. It’s too random. Good roll or draw? You win. Bad? You lose. Tactics come into it, but with Eternal War missions, you KNOW what you have to do and go DO IT. I would never have thrown away the Land Speeders if objective 5 had not come up. Who knows? A lucky couple of shots with the Land Speeders might have hurt or even killed the Titan. As it was, I needed to take stupid risks to get objectives that I had less than a turn to prepare for.
No more prep. Tournament is at the end of the month. Next: a super secret project and the tournament! Stay tuned!
Tournament Prep 2: Update for the new Codex
New codex, new overpowered formations. Can I stay true to my old school roots and eschew 300 points of free transports?
Well, of course, but can I WIN? As a test, I played Ian’s allied Sisters and Mechanicus.
——————————————————————————————————————
Bozeman – Azure Flames (Salamanders Space Marines)
-Leonidas, captain of the 1st Company (counts as Vulkan He’Stan)
-Librarian, Psyker level 2, Space Marine Bike
—Pyromancy powers: Flame Breath, Firey Form, and Fire Shield
-Tactical Squad x10, Veteran Sergeant, Power Fist, Melta Bombs, Combi-Melta, Meltagun, Multi-Melta
—Dedicated Transport Rhino, Extra Armour
-Tactical Squad x10, Veteran Sergeant, Power Fist, Melta Bombs, Combi-Flamer, Flamer, Multi-Melta
—Dedicated Transport Rhino, Extra Armour
-Scouts x5, Bolters
—Land Speeder Storm, Multi-Melta
-Dreadnought, 2x Twin Linked Autocannon, Extra Armour
-Ironclad Dreadnought, Ironclad Launchers, Heavy Flamer
—Dedicated Transport Drop Pod
-Assault Squad x5 (no jump packs)
—Dedicated Transport Drop Pod
-Bikes x8 plus Attack Bike, Veteran Sergeant, Power Fist, 2x Meltagun, Multi-Melta, Melta Bombs
-Land Speeders x3, Multi-Meltas
-Thunderfire Cannon
-Predator, Heavy Bolter Sponsons, Extra Armour
——————————————————————————————————————
Ian – Adeptus Mechanicus, Skitarii, and allied Sisters of Battle
-Techpriest Dominus, Phosphor Serpenta, Eradication Ray
—Archutech Specialist Warlord Trait
-Kataphron Breachers x3
-Kataphron Destroyers x3
-Corpuscarri Electro-Priests x5
-Skitarii Vanguard x10, Arc Rifle, Plasma Cavalier, Arc Pistol, Auspex
-Skitarii Rangers x10, Transonic Arquebus, Arc Rifle, Plasma Cavalier, Phosphor Pistol
-Uriah Jacobson
-Battle Sister Squad x5, Combi-Flamer, Flamer, Heavy Flamer
—Immolator, Twin Linked Multi-Melta
-Battle Sister Squad x5, Combi-Flamer, Flamer, Heavy Flamer
—Immolator, Twin Linked Multi-Melta
-Dominion Squad x5, 4x Meltagun, Combi-melta
—Immolator, Twin Linked Multi-Melta
-Dominion Squad x5, 4x Meltagun, Combi-melta
—Immolator, Twin Linked Multi-Melta
-Exorcist, Storm Bolter
-Exorcist, Storm Bolter
——————————————————————————————————————
Tournament Mission 1: Command and Conquer
Terrain: 6’x4′ board, 2x ruined buildings, 2x hills or craters, 1x impassable LOS blocking feature, 1x river or water hazard, 2x forests that count as “twisted copses,” 1x Armor 14 medium building with 4 access doors and 4 fire points, one in each direction.
At Any Cost: The building may ALWAYS be targeted for shooting and assault, regardless of who is occupying the building.
Deployment: Dawn of War
After placing terrain but before deployment, players roll off, and then take turns placing 3 objectives labeled 2, 3, and 4. Objectives must be within 24″ of the center of the board, 6″ from a board edge, and 12″ from another objective.
After deployment, players place one objective each (labeled 1 and 6) in each others deployment zone. Objective 5 is not placed because whatever.
At the end of the game, objectives 2, 3, and 4 are 3 victory points, and objectives 1 and 6 are 5 victory points.
I won setup. There was no night fight, and no initiative seized.
Setup:


Not shown: Several of Ian’s units used a Scout re-deploy.
——————————————————————————————————————
Turn 1: Azure Flames
Librarian with the bikes moves up, casts Firey Form and Fire Shield. Bike meltas and Thunderfire cause one glance and one pen on the Immolator to the right, making it fore snap shots. Leonidas and the Assault Squad flame the Skitarii Rangers, killing the whole unit foe first blood and leaving only the Techpriest Dominus remaining! The Dreadnought and the Predator kill two of the Kataphron Destroyers, and the third breaks and flees off the board! Melta tatsquad, Land Speeders, and other Bike combat squad move right around the weird white impassable hill.

The Immolator survives the odds…

Leonidas clears out the Rangers.

Hug the wall!
Turn 1: Adeptus Mechanicus and Sisters
Uriah Jacobson and a Dominion Squad, the Techpriest, and one of the Exorcists reduce Leonidas and the Assault Squad down to Leonidas and one Flamer. The Electropriests advance on objective 3, and the Kataphron Breachers put a glance on the Dreadnought. Battle Sister Immolators and the Skitarii Vanguard move out towards objective 2 in the center.

The Assault Marines are blasted!

The Kataphron unleash some Haywire fire!

Advance!
Turn 2: Azure Flames
Bikes advance toward Uriah Jacobson. Librarian casts Firey Form, Flame Breath, and Fire Shield. Bikes open fire, removing the whole squad. Leonidas and the remaining Flamer Assault Marine charge the Kataphron, killing two and running the last one down. Fire kills one Immolator in the center. Ironclad arrives and its Heavy Flamer kills 7 of the Skitarii Vanguard. Bikes approach the 5 point objective, #1.

Uriah, the Sisters, and the Kataphron are eliminated!

The Center is contested…

The Ironclad deals with the Rangers, while the Bikes take the objective.
Turn 2: Adeptus Mechanicus and Sisters
The Electropriests, Battle Sisters, and one of the Exorcists shoot Leonidas, killing the Assualt Marine. The Electropriests and the Techpriest charge him and a flurry of 1s take Leonidas out, for Slay the Warlord! Another Exorcist fires 6 missiles at the Ironclad and does one glance… Battle Sisters do a trick shot, kill a bike with a Bolter, and the bikes break!

Leonidas is eliminated!

Lots of missiles! Not so much on the damage…

Fact: Space Marines are Leadership 8. Fact: this can bite you in the ass. Fact: And They Shall Know No Fear sort of makes up for it. Sort of.
Turn 3: Azure Flames
Scouts in the Land Speeder Storm arrive by objective 1. Ironclad does a disordered charge and kills some battle sisters. The Thunderfire kills the Electropriests and the meltaguns on the bikes kill the Techpriest for Slay the Warlord! Dreadnought takes the last hull point off of the Immolator that held Uriah Jacobson.

Objective secure… for now…

Dreadnought deals with the Sisters while the Electropriests are ruined by the Thunderfire, clearing the way for the Bikes to kill the Techpriest.

Immolator is gone.
Turn 3: Adeptus Mechanicus and Sisters
The Battle Sisters charge the Bikes, and are cut down! Unbelievable Exorcist missile shots kill two Land Speeders and strip the meltagun off the third! Ironclad finishes the Immolator.

The Sisters choose to charge! This is not advisable…

A missile blast from the Exorcists take out the Land Speeders!
Turn 4: Azure Flames
The Tactical Squad and the Dreadnought move toward the objective. The Bikes disordered charge the Exorcists, and kill one.

Exorcists are charged, and one dies!
Turn 4: Adeptus Mechanicus and Sisters
The last Dominion squad arrives from reserves. Its Immolator kills the Land Speeder Storm, while the Immolators kill a bike and put a wound on the Attack Bike. The surviving Exorcist fires on the Ironclad, but fails to do damage.

Last chance at the objective! The Dominion squad brings the Melta hurt.

BEEP. BEEP. BEEP. BEEP.
Turn 5: Azure Flames
Bikes charge and kill the last Exorcist. The damaged Land Speeder takes the objective, while the Scouts and Thunderfire wipe out the Dominion squad. The Bikes break the Multi-Melta on the Exorcist.

Exorcist is gone.

Only a damaged Immolator is left…
Turn 5: Adeptus Mechanicus and Sisters
Damaged Immolator tank shocks the Scouts. Game ends.
 ——————————————————————————————————————
Final score:
Azure Flames: 19 plus Linebreaker, Slay the Warlord, and First Blood: 22
Adeptus Mechanicus and Sisters: 0 plus Slay the Warlord: 1
——————————————————————————————————————
Final Thoughts: I think this list is still pretty strong. Objective Secured would have helped if there had been more resistance around objectives. Every unit performed a task. Leonidas should have lasted one more turn, but I rolled poorly for saves. Ian had a couple bad rolls here and there, and some stuff that should have died (like the Ironclad) actually lived.
Next: Assault Marines painted, possibly Battlefleet Gothic, and one more game at Highland before the tournament! Based on other people’s lists, no one is making as super ridiculous list that can’t be beaten. However, some people have signed up without me seeing what they have brought. We shall see whether 40K is still alive and kicking or a hotbed of auto-win crap. Stay tuned!
Tournament trial 2000 – Can a Highlander list defeat a modern 40K tournament?
I’ve been pretty hard on tournaments in the past (trawl through my previous posts if you’re bored). However, the players in Highland are getting some pretty heavy prize support from a local store, and they sold it as a balanced well run tournament.
I was intrigued. That rarely happens when you mention the word “tournament” around me.
Rules stated that the list should be 2000, and follow all the rules for army composition. This turned me off a little, as 40K has been going into the “buy this formation for an auto-win” direction. So, I played with another rule.
I went full Highlander.
It’s not a Highlander tournament, I was just in a Highlander mood. For those unaware, a Highlander list cannot have ANY repeat choices, except for troops. I’m not talking the lame Space Wolf rule that two exactly identical characters but one has melta bombs counts. I mean if you choose a Librarian, you can’t take another. This prevents spam, overpowered crap, and other stuff that makes 40K just unbearable to me.
So I decided to do an experiment. Other people are going to bring their lists this week, so I’d pit my list against theirs and see if I had a chance. If new 40K codex creep makes a balanced, fun, fluffy list untenable then Tournaments are not my scene. However, if I have a chance, I’m going for it.
So, how’d it go? Let’s find out!
——————————————————————————–
Custom Tournament Mission #4: Right Place at the Wrong Time
Deployment is decided randomly. During the tournament, all simultaneous games will have the same deployment. We rolled Vanguard Strike (corners).
Six objectives are placed as per a Maelstrom mission from the core rulebook. When an objective is first claimed, roll a D6. On a 1, the objective explodes with a S5 AP4 3″ blast from the objective, and the objective is removed. On a 2-3, the objective is fake, remove it. On a 4, the objective is real! Roll a D6 to determine what kind of Mysterious Objective it is. Re-roll all results of 1, as the objective is not booby trapped. After 3 objectives have been removed as fakes, or found to be real, either remove objectives or mark them as real so that 3 real objectives remain.
Objective are worth 3 VPs. First Blood, Linebreaker, and Slay the Warlord score as normal.
All tournament boards will have the following terrain:
– 2 ruined buildings, chipboard around building counts as area terrain
– 2 hills or craters, or a mix
– 1 impassable line of sight blocking wall
– 1 river or other water hazard
– 2 forests that count as “twisted copses” from the main rulebook
– 1 building, armor 14 all around, with entrances on all 4 sides, one fire point on each side. This building has the special rule “At any cost necessary” which allows you to target the building, even if your own troops are occupying it (for Maelstrom missions).
——————————————————————————–
Bozeman – 2000 point Highlander (battle forged)
– Leonidas, captain of the 1st company (counts as Vulkan He’stan)
– Librarian, Level 2, Space Marine Bike, Flame Breath, Fire Shield, Spontaneous Combustion
– Tactical Squad x 10, Veteran Sergeant, Combi-Melta, Power Fist, Meltagun, Multi-melta in a Rhino
– Tactical Squad x 10, Veteran Sergeant, Combi-Flamer, Power Fist, Flamer, Multi-melta in a Rhino
– Scouts x 5 with bolters, in a Land Speeder Storm with a Multi-melta
– Dreadnought, 2x Twin Linked Autocannons
– Ironclad Dreadnought, Heavy Flamer, Ironclad Launchers, in a Drop Pod
– Assault Squad x 5, 2x Flamers, removed Jump Packs, in a FREE Drop Pod
– Bike Squad x 8 plus an Attack Bike, Veteran Sergeant, Power Fist, 2x Meltaguns, Multi-melta
– Land Speeders x 3, 3x Multi-meltas
– Thunderfire Cannon
– Whirlwind
– Predator Destructor (autocannon), Heavy Bolter Sponsons
——————————————————————————–
Dominic – 2000 Eldar (unbound)
– Wraith Host Formation
— Spiritseer, Embolden/Horrify, Protect/Jinx, Conceal/Reveal
— Wraithguard x 5 with Wraithcannons, in a Wave Serpent with a Scatter Laser and Holofields
— Wraithguard x 5 with D-scythes, in a Wave Serpent with a Scatter Laser and Holofields
— Wraithguard x 5 with Wraithblades, in a Wave Serpent with a Scatter Laser and Holofields
— Wraithlord, 2x flamer, Ghostglaive, 2x Brightlances
— Wraithknight with Suncannon and Scattershield
– Farseer, (warlord trait: split fire), Guide, Mind War, Fortune, Will of Asuryan
– Dire Avengers x 10, Exarch, Shimmershield in a Wave Serpent with a Scatter Laser and Holofields
– Crimson Hunter with an Exarch Pilot.
——————————————————————————–
Setup:

Above setup map enhanced with MS Paint to show the position of the 6th objective.


——————————————————————————–
Turn 1 – Eldar
Wave Serpents move out and fire on the Rhinos, taking 2 hull points off each and immobilizing one. The Wraithknight fires on the bikes, forcing them to jink and killing 2. The objective by the wave serpent explodes and disappears.

The Eldar move out.

Flames under fire!
Turn 1 – Azure Flames
The Ironclad drops in, but a holofield save prevent its meltagun from popping a Wave Serpent. The rest of the army moves out and fires, killing the Wave Serpent holding the Wraithguard with D-scythes. Objective behind the wall is real!

Move out!

The whole army was necessary to kill one Wave Serpent… This does not bode well. Plus, Holofields are a hell of a drug.
Turn 2 – Eldar
Wraithguard with D-Cannons pop out and destroy a Rhino. A bad morale check leaves the occupants pinned! Further fire from Dire Avengers whittle a few tactical marines away. The D-scythe Wraithguard annihilate the Ironclad. Lucky Jink saves protect the Land Speeders. Bike combat squad with the attack bike takes a few casualties. They fall back 4″. Side shots wreck the Predator. The Wraithlord arrives from reserves and walks on. The Eldar reveal two more fake objectives, all the rest are real!

Jink for your lives!

Pinned!
Turn 2 – Azure Flames
Leonidas and the Assault Squad arrive and bake the Dire Avengers. Scouts arrive in the Land Speeder Storm. Librarian casts Fire Shield on the assault Squad. Lucky melta shot on the Crimson Hunter causes a penetrating hit, and forces the jet to fly off the table next turn.

Dire Avengers go bye-bye.

Masses fire has little effect when the enemy can ignore it…
Turn 3 – Eldar
Th D-scythes vent their rage on the Drop Pod. The Wraithknight kills all but Leonidas and one Assault Marine. The Wraithguard with wraithblades attemp to charge the bikes, but re-rolling meltas kill one and prevent the charge! A Wave Serpent fires on the Whirlwind, glancing it.

Overwatch saves the day!

Sneaky Wave Serpent!
Turn 3 – Azure Flames
Leonidas, the Assault Squad, and the Tactical Squad assault the Wave Serpent on the hill, killing it. The Librarian suffers a Perils of the Warp, and overcharges himself, gaining a whole slew of POWER! He and the bikes assault a second Wave Serpent, killing it. The other Tactical Squad assaults the last Wave Serpent, also killing it. Hat trick!

Krak goes the grenade.

Marines with krak grenades STANDARD are fantastic. You used to have to pay 2 points in 3rd edition!
Turn 4 – Eldar
The Wraithknight fires on Leonidas, and kills the last assault marine. It tries to charge Leonidas, but a roll of 4 with -2 for difficult terrain fails. The Crimson Hunter arrives, and kills the Dreadnought. Fire kills one Land Speeder. Wraithblade Wraithguard charge the bikes, killing all but the Librarian. Wraithguard with D-scythes destroy one Land Speeder and the last saves with a lucky jink from the Wraithlord.

Planes are an aspect now?

I COULD charge you… but, I’m tired… yeah, that’s the ticket.

The Wraithguard make the bikes pay for their arrogance.

The Land Speeders provide a distraction.
Turn 4 – Azure Flames
The Tactical Squad charges to save the Librarian. They kill one Wraithguard, but lose two, lose combat, and flee… four inches. Leonidas boldly charges the Wraithknight to delay it, and succeeds, surviving the attacks. The last Land Speeder flees behind the building to secure Linebreaker, while the Bikes advance.

Combat does not go as planned, but the Librarian is extricated.

A last, desperate charge.

Not pictured: the Land Speeder behind the building.
Turn 5 – Eldar
The Crimson Hunter arrives, after being forced to fly off the board. It forces the tactical squad on the hill to go to ground. Wraithlord and Wraithguard advance on the objective by the crater. The Wraithknight finishes off Leonidas for Slay the Warlord. Wraithblades charge the Tactical Squad, but are all killed.

Aircraft incoming!

Objective is being held.

Leonidas held as long as he could…
Turn 5 – Azure Flames
Bikes contest the objective and kill a Wraithguard. Librarian and Tactical Squad move out towards the hill. Land Speeder Storm peeks out from behind the building. Game continues to turn 6.

Selling their lives dearly.

The Librarian moves to assist the beleaguered tactical squad.
Turn 6 – Eldar
Wraithknight shoots, assaults, breaks, and chases off the board the tactical squad on the hill. It consolidates right in front of the Librarian. Crimson Hunter takes aim at the Thunderfire holding the objective, and precision shots kill the Techmarine, removing the Thunderfire. D-scythes end the bike squad.

Come get it!

Bikes are toast.

Precision shots clear the objective!
Turn 6 – Azure Flames
Whirlwind moves up to claim the objective behind the wall. Tactical squad runs 6″ behind the Wraithknight, and secure the objective. Scouts run out of the Land Speeder Storm, and thanks to Objective Secured, steal the crater objective right out from under the Eldar! Game ends!
——————————————————————————–
Final score:
Azure Flames – 3 objectives plus First Blood and Linebreaker – 11 VPs
Eldar – Slay the Warlord and Linebreaker – 2 VPs
——————————————————————————–
Well, even with D-strength flamers, and a fancy-schmancy formation, the Highlander came out on top. It looks like this might be a tournament worthy list after all. Let’s do it!
Dominic’s list has neat stuff, but because the Wraithguard are so expensive, it had few options to hold points. Those D-scythes are potent terror weapons, but they need to be in position to do the most damage. They can also only kill one unit per turn, so a list with lots of targets can overwhelm them. Personally, I’d like to see more aspect warriors. Some Fire Dragons and Striking Scorpions would be awesome in Wave Serpents.
Next: some more Gothic if I can swing it, an Assault Squad painted, and more Highland tournament prep! Stay tuned!
The Bait rematch – Tau Shan’al Shi’ur vs. Imperial Navy
Stephen and I wanted to get together to play another game of Gothic. However, due to mutual delays, we couldn’t get started until 9pm. Stephen suggested a rematch of The Bait, which he played against my Dark Eldar. This time, however, I was the pursued as my Tau Kor’or’vesh fleet!
——————————————————————————
Mission: The Bait
Setting: Outer Reaches
——————————————————————————
Bozeman – Tau Kor’or’vesh Shan’al Shi’ur
-Lar’shi’vre “Protector” class cruiser, T’au Lar’shi’vre Aloh Sho’ka, T’olku configuration (pursued ship)
-Il’porrui “Emmisary” class light cruiser, T’au Il’porrui M’yen Lar’shi, Bor’kan configuration (squadroned with two other ships below)
—–Il’porrui “Emmisary” class light cruiser, T’au Il’porrui Lynu Kar’tyr, Bor’kan configuration
—–Il’porrui “Emmisary” class light cruiser, T’au Il’porrui Sh’ve Mont’re, Sa’cea configuration
–Vral Squadron: 4 Kir’la “Warden” escorts and 1 Kir’shash’vre “Castellan” escort
——————————————————————————
Stephen – Imperial Navy
-Avenger class grand cruiser
-Dauntless light cruiser (torpedo configuration)
-Dauntless light cruiser (lance configuration)
-Squadron of 2 Cobra destoryers
——————————————————————————
Setup:


——————————————————————————
Turn 1 – Tau Shan’al Shi’ur
The Aloh Sho’ka fails to go on Come to a New Heading, and so simply moves and launches missiles and a fighter for a CAP.

Turn 1 – Imperial Navy
A bad roll prevents the fleet from going on special orders. The whole fleet advances.

Turn 2 – Tau Shan’al Shi’ur
Aloh Sho’ka Reloads Ordnance and turns.

Turn 2 – Imperial Navy
Cobras and the torpedo Dauntless get All Ahead Full, but the other ships don’t. Small torpedo wave from a cobra stops the CAP around the Aloh Sho’ka, and the Dauntless fires torpedoes. It fails to brace. One damage causes an Engine Room Damaged result!

Turn 3 – Tau Shan’al Shi’ur
Aloh Sho’ka re-launches a CAP and fires at the Cobras, taking down a shield. The squadron of 3 Emissary light cruisers arrives, and fire 8 missiles at the lance Dauntless. One missile is shot down by turrets and the rest… MISS! 8 misses on a roll of 5+! Things are looking down for the Tau…


Turn 3 – Imperial Navy
Fleet moves up, but fire is ineffective. The other Cobra fires torpedoes at the Aloh Sho’ka and removes the fighters on CAP.

Turn 4 – Tau Shan’al Shi’ur
Aloh Sho’ka goes on All Ahead Full to get around the Warp Rift. The Emissaries Reload Ordnance and fire on the Dauntless again, doing minor damage. The missiles remove a Cobra.

Turn 4 – Imperial Navy
The lance Dauntless fires on the Emissaries, but do no damage. The torpedo Dauntless fails to reload, so it chases the Aloh Sho’ka.

Turn 5 – Tau Shan’al Shi’ur
The Emissaries Reload Ordnance, and combined fire reduces the lance Dauntless to a Blazing Hulk! Vral Squadron comes in from the board edge, destroys the other Cobra, and lowers a shield on the torpedo Dauntless! The Dauntless Braces for Impact.

Turn 5 – Imperial Navy
The blazing Dauntless suffers a Plasma Drive Overload, exploding and firing 4 lances at one of the Emissaries, lowering one shield and doing no damage. The Avenger grand cruiser puts the Emissaries in its sight, but a poor roll does no damage. Torpedo Dauntless on Brace fires ineffectually at Vral Squadron.

Turn 6 – Tau Shan’al Shi’ur
Emmisaries Come to a New Heading to get a shot on the Avenger, but the order reduces their weapons and has little effect. The Aloh Sho’ka Reloads Ordnance and fires missiles and a Manta Bomber. Vral Squadron cripples the Dauntless.

Turn 6 – Imperial Navy
Dauntless disengages. The Avenger fires on the Emissaries causing a Brace.

Turn 7 – Tau Shan’al Shi’ur
Emissaries fire on the Avenger, taking down only 2 shields. Missiles and the Manta prove ineffective.

Turn 7 – Imperial Navy
Avenger disengages. Turn not pictured.
——————————————————————————
Final score:
Bozeman: 219.5
Stephen: 0
——————————————————————————
Stephen really loves that Avenger. Honestly, I can’t understand why. It’s up-gunned, but only up close. It has no dorsal or prow armaments to lend it some versatility. It seems to be good only against the Imperial Navy, who also has to get close, or perhaps Tyranids. I’m not a fan. I’d rather have the Vengeance which can scare the pants off of Eldar, or the Exorcist for some fighter craft fun. The Avenger lost him this game, even though it didn’t get hurt. It was so SLOW, and short range that it didn’t get to do much. More Dauntlesses, escorts, or Nova Cannons would have been nice. A Dominator could have ended the Aloh Sho’ka in two or three turns with luck, or forced it to brace in fear the whole game.
Next: more Gothic? Projects? Perhaps some fun times at Highland?
Big Game 2, a blast from the past.
 Meeeeeeeeemories…
Oh man. Lexington came to visit me and we took a walk down memory lane. He brought me some photos of a past I had almost forgotten.
So, in previous posts I’ve detailed some of the Big Games, mostly Big Game 5. However, there were others. Big Game 1 was hardly worthy of the name, it was a big mess. No one knew what we were doing, and some drunk fratboys interrupted us. But it gave us ambition.
Ambition for Big Game 2.


As you can see, we’re on the floor. This was in the the pole barn of our friend Jake’s Parent’s christmas tree farm. The central city used the 3rd edition rules found in Codex: Cityfight (remember that?). The yellow taped areas are “ruins” and the green “forests.” You see kids, back in 3rd edition, we had to use our imaginations. We were allowed to make area terrain without having actual trees. Sure, it’s not as visually exciting as having an actual ruin or forest, but it allows more freedom of terrain.

Seen here, the “good guys” reserves table.

…and here are some awkward looking young men! To the left, in the foreground, is Andy (who we called Other Andy), who played Dark Angels. Sadly, we lost touch with Other Andy, as this was the age before Facebook. Standing above him is John. Yes, the one who introduced me to Battlefleet Gothic, here playing his Tyranids. The blurry kid in the jacket in the foreground is none other than yours truly, bringing the relatively young Azure Flames. In the back, Joe (left) confers with Brian B. (right). Joe was the leader of the “good” side, with his Space Marine chapter: the Angels Sacrosanct, a Blood Angels successor. Brian B. is Little Matt’s younger brother, here with his Imperial Guard.

Here, Dark Eldar and Iron Warriors advance together.

Imperial Guardsmen defend the large building in the City.

Other Andy’s Dark Angels were supposed to all Deep Strike. Sounds great, right? They can go where they’re needed. However, we found out after the game began that he could only Deep Strike… within 24 inches of the Fuel Dump. So, he got to deploy randomly in a tight area and lose two of his units to Perils of the Warp.

Joe is at left, walking away. Other Andy and I are on the ground. Checking his watch is Andy (not Other Andy) who brought his Chaos Marines. To the extreme right, “Little” Matt B, with his Iron Warriors.

Me and Other Andy try to take the dark portal.

The Tank Company advances toward the city.

The Azure Flames had a small force guarding the bridge. They were supposed to hold out so that reinforcements would come…

…sadly they were waylaid by Eldar. The Evil forces take the bridge.

Scott’s Orks roll into the city.

John’s Tyranids deploy… out of focus.

John’s Tyranids advance on the city as well.

…and enter the city.

…IN FORCE!

Space Wolves drop pod in to take the building from Dark Eldar. Some veterans may recognize that building from GORKAMORKA.

Finally (which is ironic because it’s not the end) Andy (on the ladder) and Scott (from the waist down) survey the battle for the “bad” guys. Fun story: Scott almost fell off that platform, and Andy ran to catch him. That rope hanging from the ceiling and Scott’s quick wits are the only reason both of them did not go to the hospital that night. Fun!
So, how did Big Game 2 end? The “bad” guys won. However, it set the stage for Big Games 3 and 5 (Big Game 4 was along a different narrative).
*drowns in nostalgia*
Compendium Updates
Check the sections to the right. Blood Bowl has been given a version 2.0 upgrade with MASSIVE re-organization. Battlefleet Gothic also got a minor tweak. Rules for setting up Warp Rifts were added to the terrain setup section.
Imperial Navy vs. Dark Eldar – The Bait (at AFK)
Dastardly Dark Eldar pirates have been preying on shipping lanes. Top Admirals plan to risk the Avenger class Grand Cruiser Enif to set a trap for the pesky aliens! Will the Dark Eldar be curtailed, or will the Imperials come up with empty nets?
————————————————————————
Mission: The Bait – Deep Space
————————————————————————
Bozeman – Dark Eldar
-Torture class cruiser Gift of Discord, Launch Bays, Mimic Engines
-Corsair class escort x2, The Knives of Sweetness, Impaler Attack Craft, Mimic Engines
-Corsair class escort x2, Needle’s Promise, Impaler Attack Craft, Mimic Engines
————————————————————————
Stephen – Imperial Navy
-Avenger Grand Cruiser Enif (Pursued Ship)
-Lunar Cruiser Adara
-Dominator Cruiser Avior
-Dauntless Light Cruiser Resa (Lances)
————————————————————————
Setup


Before the game began, the Dark Eldar took a move, thanks to Mimic Engines!

Turn 1 – Imperial Navy
The Enif goes on All Ahead Full. No help arrives.

Turn 1 – Dark Eldar
The Knives of Sweetness Come to a New Heading to avoid the dust cloud, and the whole fleet fires Torpedoes, Impalers, and Bombers. Total damage done to the Enif is 6, including two Engine Room Damaged results! The Enif refuses to Brace for Impact.

Turn 2 – Imperial Navy
The rest of the Imperial fleet arrives, with the Lunar and Dauntless on All Ahead full! A bank shot from the Dominator removes one of the Needle’s Promise escorts. Torpedoes stop short of the Gift of Discord.

Turn 2 – Dark Eldar
Lucky torpedoes cause 2 damage to the Gift of Discord! The Dark Eldar fleet Reloads Ordnance, except the remaining Needle’s Promise escort who disengages. Battery fire finishes the Enif, but lucky turrets and Brace saves prevent the launched ordnance from harming the Lunar and Dominator.

Turn 3 – Imperial Navy
The surviving fleet closes in. Failure to brace by the Gift of Discord dooms it to a drifting hulk! The Knives of Sweetness brace and survive.

Turn 3 – Dark Eldar
The Knives of Sweetness attempt a bold boarding action! …they lose and one of them dies. Game ceded.
 ————————————————————————
Final Score
Imperial Navy – 325
Dark Eldar – 230
————————————————————————
Ugh! I could have won had I disengaged on turn 2 (a classic Dark Eldar move) but I got greedy. The Dark Eldar all-ordnance fleet is terrifying, but I think next time a more balanced approach could give me more options, such as Lock On with Phantom Lances and Batteries. Stephen did what you should do in The Bait: pounce!
Next: Epic Eldar, possibly a training mission for Gothic, more Epic at Highland, and perhaps more Compendium stuff! Stay tuned!
Epic Daemon Pool Counter
Daemons are a tough thing to keep track of. Appearing from the warp. Disappearing into the warp. Stealing cookies. That sort of thing.
Well, now you can keep track of your extradimensional entities in STYLE. Behold! The Daemon Pool Counter!
Epic Armageddon Daemon Pool Counter
 Instructions:
-Print the file in color on 11×17″ Tabloid paper.
-Trim 1.25″ off of the long edges and 3″ off the short edges to cut it down to 8.5×11″ with a full bleed.
-Laminate the sheet.
-During the game, place two Blast Markers on the Counter, corresponding to how many Lesser and Greater Daemons you purchased. When you summon Daemons, move the Blast Marker down, and when the Daemons are removed or unsummoned move the Blast Marker up.
Have fun ripping down the walls of reality!